Evalina Rose and her little sister Posy Anna are the main characters of a series of children's stories that I am writing. In this blog I will share the final stages of crafting their half scale house--Honeysuckle Cottage--and the miniature stuff that will make up the settings of their stories.

Showing posts with label miniature knitting. Show all posts

Friday, November 9, 2012

Dressing a Tiny Doll


   I thought you might like to dress the little Fimo "china-head doll" that I described a few posts ago.  The following directions will work with any small figure.  This method is simple, and I think , quite nice.  I made collages, as I usually do, to save space.  Follow the pictures from the top, moving left to right.  If you can use the pictures, feel free to down load them for a reference.
First, I wrapped the wires with cloth tape(this is something new for me, I usually use silk ribbon and glue).  I used first aid tape.

 The first step to dressing her is to make some pantaloons.
I fold two squares of material together and cut a tiny curved line...this is the crotch.
  I end up with two identical pattern pieces that are shaped like the third picture.
  Some people just glue the seams, but for some reason, I am very clumsy with glue.  I sew the crotch seam first and then measure the inseam and cut it to fit the inner leg.
  I then sew the inseam  as shown in the fourth picture.
  The fifth picture shows how it will fit before I gather the waist and the ankles.  I like the pantaloons to fit  just bellow the doll's breast plate.
  I use a running stitch to gather the waist and ankles and then carefully glue a tiny piece of lace to the bottom of her pantaloons.

I measure a rectangle of dress material to fit the doll.  (I wanted the dress to come to the top of her shoes.)
 I sew up the side seam and add a tiny bit of glue to the seam to hold it flat.
  I add a piece of lace to the bottom, and gather the waist with a running stitch.
 The sleeves are glued directly onto the arms, using tiny strips of material.
 I apply a bead of glue around her shoulder plate.
 The bodice is a piece of lace, that is glued into a ring.
 I gather the top of the lace with a running stitch(this will be the neck hole) and pull it over her head and press the ruffled  lace into the glue around her shoulder plate.

I chose a purple ribbon for her shoes and the bow for the back of her dress.
 First, I apply glue to her whole foot. Then I wrap the ribbon around the foot pinching the two ends at the back.
  I cut a small piece of fabric tape into the shape of the sole of a shoe.
 I glue the sole onto the bottom of her foot.
 The final touch for this doll is a bow on the back.
 This method could have all sorts of details added to it to make it fancier.  For example tiny pearls can be added to the shoes to look like buttons  and embroidery can be added to the dress. 

This is a little boy who will go with the mother and sister whom I have mentioned in a previous post. I think I am going to name him Hugo because it is such a big name for such a small sweet boy.  I gave him a striped union suit for the fun of it and also because the stripes peek through his sailor shirt.  I  still have to knit his sailor collar and his knickers.  He will have little black boots with "brass" buttons.

I always forget to welcome new followers and to thank my regular followers for their lovely comments.  I do not mean to be rude, I just have a hard enough time getting my pictures and text in the right place...so please forgive me.  Welcome to my new followers and thank you for all the lovely comments, as a mother of two teenagers, I can use any positive feedback that I can get.
Have a great weekend,


Monday, November 5, 2012

Too Busy to Blog

I have found myself very busy this fall.
 My children are so busy with sports and ballet recitals, and my mother is very successfully having her cataracts replaced.  I am so impressed with how well her surgery is going...she can see again.  We go in tomorrow for her left eye.  I have been traveling back and forth to help her out, and will be settled back home by Thursday, and  I hope to get back to blogging at that point, but for know, I will quickly show you who I have been working on.
 I am trying to get some dolls done for sale, as I am planning on attending the IGMA show next year.  These two little ladies will go in my sales box.

Two new girls  for my sale box.  The red girl is Poppy and the pink girl is Eliza.
Poppy has a green coat, but I love her little red dress and I think I will leave her coat off as a piece of her wardrobe.
Eliza has a removable collar that is tied on.   The pink in her pinafore is a lovely shell pink and does not show up in the pictures.
Eliza has pantaloons and a slip  made of white cotton, knit on 6/0 needles. Her dress is also knit in the same manner and is tied at the back.  her hat and collar are tied on .  I usually tie garments on and apply a small drop of glue at the juncture.  This allows me to break the little seal of glue and remove the garment when I want.  If I am intending to make a full wardrobe -with two or more dresses- for one of my dolls , I leave the strings long enough to retie , but if the doll is to stay as is, I clip the strings to an appropriate length.  Eliza has a pinafore made of  a very fine linen, which is lovely, but hard to knit.
Poppy has pantaloons, a slip  and a little red dress,knit on 6/0 needles . I have embroidered little flowers on the bodice.  She has a green silk hat and a "carpet bag".  Her green coat still needs some work...I think that I will add a black collar and some little bead buttons.
Eliza 
It is hard to get close-ups of their tinny faces!


Have a wonderful week,

Monday, October 8, 2012

Make Your Own Tiny China-Head Doll

For those of you who would like to make your own "china-head doll", here is a Fimo version that anyone can make.  I am working on writing directions.  It is a whole different style of writing than writing stories--I am not very good at it.  If you have any questions, or need better photos, just ask.

The collage bellow illustrates the steps to create a tiny doll...feel free to download for your own use
  The first picture in my hand is of two porcelain boy dolls that I wanted to show you.  You will make your doll parts directly onto the wire frame.  (I fire my pieces and then glue them to the frame.) This Femo method can be used for flesh colored dolls or animal dolls, here I used white to simulate china.  I like to make mice and other animals to dress like dolls.  Once you have made the doll, you should wrap the wire with strips of cloth and glue  (I usually use white silk mini ribbon for this purpose).

First twist two pieces of wire at the center.   Bend the top pieces into shoulders and arms and the bottom pieces into hips ad legs.
  Make a shoulder-plate and neck out of   Fimo...bake it.  Be sure to bake it for 10 minutes and let it cool all of the way.  Put a very small amount of liquid Fimo on the neck.
 Place a small oval of Fimo onto hardened neck.  Note that the back of the head should be higher than the chin.
 I was in such a hurry to make this tutorial, that I did not let my neck cool enough and it snapped in the process of adding the head.  I had to plop a head on and as you can she , she has no neck.
  using a fine stylus, add some facial details...two slight indents for eyes should be pressed in the middle of the face and a slight dent for mouth.  Be careful not to over-sculpt ..this is a tiny face and you do not want to over do it.   Gently nudge the Fimo with stylus to form a chin
 I added a bun at the top of her head.
Bake the head.
Cut the arm and leg wires to the lengths that you like and make some little arms and legs right onto the wires.  I press the hands into a slight point and place them in the direction that I like.  I did not make fingers.  You may want to make fancy shoes...I made them simple and will show you latter how I make shoes out of ribbon.
Bake the doll to harden legs.
I used liquid Fimo to add  thumbs and a nose in small drops placed on with a toothpick. then I baked The doll one more time.
  I am out of black acrylic paint, so I used dark  brown to paint her hair.  Paint her hair slowly with tiny brush strokes to simulate hair at her neck and around her face.
  To paint her face.  I  made two tiny dots for eyes, two thin lines for eyebrows out of brown paint to match her hair.
  I found a nice rose acrylic for her cheeks and mouth.
  I use my thumb nail as a palette for tiny amounts of paint.
 For the cheeks I added a small amount of water to my thumb- palette and mixed it with paint, so that I made a blush.
  I used the paint straight for a clear little dot of a mouth.
  When I was done, and the head was dry, I covered the head and shoulders with triple thick varnish.


This is my latest porcelain china- head doll.  I have put a tutorial for knitting these tiny undergarments on my needlework blog
http://mini-needle.blogspot.com/
Here she is  in her new dress.  I am making her an ivy green coat , a green silk hat and I am trying to  design a "carpet" bag for her. 

I made a new slip for this little doll.


Have a Wonderful week,
Lucy Coles


Friday, September 21, 2012

New Miniature Needle-work Blog Open

     I am moving all of my talk about knitting to a new blog http://mini-needle.blogspot.com/, which I think  I have just opened to the public.
      My hope is, that other mini-needle-workers will help me fill this new blog with images of their work, and that the whole blog does not revolve around me.  For now, I will just write about knitting and myself...that is what I know. If you are a needle worker and have some advice or information about a product that you would like to share, please contact me at lucy_coles@netzero.net.  If you are not a needle-worker and need some advice, please feel free to ask questions...if I do not have the answer I will find it. 
     My first post is about Burmilana which is a fiber that I have mentioned on this blog, but it really doesn't belong here.  So, if you are interested in a fine wool thread that comes in 113 colors and can be used in many mini projects, come visit me on Needle work in Miniature, I'll be glad to hear from you.  mmmmmm


Miss Kitty is a new project that I am working on.  Above is the first prototype of my first pattern. She will be the first project that I descuss on my new blog...that's a lot of firsts.

Please join me on my new blog, even if you are not a needle-worker.
http://mini-needle.blogspot.com/


Friday, August 10, 2012

Summer Fun

     I have been trying out different types of clay.  In the past I have worked in porcelain,but found it too abrasive for my system.  I found some La Doll at Amazon and spent a little time with it today.  The chimney tile is a quick piece of work.  I didn't spend much time refining it, but I can tell that it will be beautiful to work with.  It has many of the same qualities of porcelain but it is more malleable.  One of the things that I like about porcelain is that you can paint fine details on with slip...La Doll allows for this technique also.
       I can,t wait to have more time to work with this clay. I think it will allow me to make great details in my work, but for now, my children and I are  off to Boston to visit my mother and the museums.

Tile for beach house chimney (2 3/4 x 2 3/4 inches)
 Normally, I would knit or embroider my own window treatments , but summer's end is close, and Annabelle's house needs to be finished.   I have a nice collection of  of vintage lace, and have used some  of it  for the beach house windows.
I have used some roses made from cold porcelain to tie back the bedroom curtains. 
I made this  blue wicker Chaise longue this week.  I used directions in  the book Wicker Furniture by Sheila Smith to get a basic idea, but changed it to suit my needs.  The lounge will go o he porch.
I need to make one more chair, a bench and two little tables, and the porch will have all of it's furniture.
Details of Gwendolyn's dresser.  I painted the china with china paints about eight years ago. The blank pieces were from Avon miniatures of the UK http://www.avonminiatures.com/  .   I plan on working on my flowers at some point, but for now they are just balancing in the vase.  The wall paper is from Itsy Bitsy Mini, and is described in an older post.
Annabelle solved our cat-in-the-house problem.  She made Bella a cardboard house which I put on top of a china cabinet.  She loves to sleep in it and to look down on all of us.   

We are planning to do a lot of mini baking.  We made these whipped cream dollops out of silicone caulking that I put in a disposable plastic pastry bag fitted with my smallest star tip.  The clean-up was easy, as the caulk cleans with soap and water until it dries.  Once  they dried I was able to store them in a little plastic container.


I finally got the nerve up to use liquid resin.   I  used Easy Cast, and it was easy. My biggest fear was that it would harden all over the place, but it takes a few hours to set, giving you plenty of time to add color, mix with tiny fruits, drop into jars and clean up.  If you are afraid to try this project, don't be.


Have a wonderful week,
Lucy Coles


Wednesday, July 4, 2012

Happy Fourth of July


My newest  bear has no name, but he is almost ready for the Fourth of July.   I did not sew his  collar down in  time for photo.
Happy Fourth of July!   Have you ever exercised with weights on your legs?  Well I have, and when you take them off, it feels like you are flying.  Such is the case with moving from half scale to one-inch scale...every thing seems so big and my hands feel as though they have shrunk.  I have spent the last week getting our Beach House ready while Annabelle attended Ballet camp.  Today I will add the porch roof and we will start applying the wallpaper.  I am going to put flagstone down on the bottom floors with Paperclay, make tiles for the bathroom floor and am undecided on the bed rooms.  


Here are the wallpapers form Itsy Bitsy Mini.  The sea horses are for the bathroom, the dogs for the living room, the roses for the girl's attic room and the pink Toile for the grandparent's bed room.  I absolutely adore them.  Annabelle picked all but the Toile.  Here is a link to wallpaper   http://dollhouse-miniature-wallpaper.com/shop/


I have not forgotten about Honeysuckle cottage.  Though, I am thinking of renaming it because I realize that if I am going to name it after a flower, I should have that flower be a main part of the garden.  I am not sure I can make half scale  honeysuckle.


Have a wonderful day,

Monday, June 25, 2012

A Crazy Week

Save me!

Just so you know what kind of person I really am...I often find myself doing really terrible things to my creations in the name of realism.  In order for such a tiny bear/ dog 's cloths to hang correctly, I had to do this to him.--I am truly sorry.  I once tried to needle felt a nativity--I stopped at jabbing the baby Jesus.  I just couldn't do it.
.
I think Pie might be a puppy.  Anyway he and Humble  are central to the Evalina stories.
     It has been a while since I have had any time to post.  We have been dealing with, the end of school, packing and sending off boys for a big camping trip, a visit from my mother and a pretty sick little girl.  Well, the boys are back, my mother has gone and our little girl has antibiotics. 
      I have not been idle all of this time, just unable to sit alone.  So I will spend some time catching up.
I have finished knitting the doily and hand towel for the wash stand.  I added a row of purple button -hole stitch to the edge to give the effect of a crocheted edge.  I love the colorful edgings  on vintage linens.  The doily is lavender.

This is a new Cassidy Creation kit awaiting pink bead knobs.

The bathroom of honeysuckle cottage is going to have a dressing room combined with the bathroom, .  It is still waiting for me to hang the wall paper.  The wall paper is above, under poor Pie.  I made the sink, and am trying to figure out a way to make a toilet and a tub.
      One of my original ideas for this blog was to have some projects for children, and to include my 7 year old daughter Annabelle as much as possible...she will out grow me soon enough.  We decided to make a beach house together.  It is meant to be a cottage, which I think should be both whimsical and elegant and of course diminutive.  So we have chosen some very beautiful wallpaper from Itsy Bitsy Mini,   http://dollhouse-miniature-wallpaper.com/shop/ , that will make the inside fun and pretty.   I will show you when it comes. 
      The inhabitants are Grandmother (who I've named Gwendolyn and Grandfather who is named Joseph after my father).   There are pictures of them in earlier posts.  The top floor will house their granddaughters who do not exist yet and have no names.  We do know that there are two of them  and there are no boys.  The girls will visit often.  The baby, who is their little sister, will stay home with Mommy.
     We chose pool blue, hydrangea green and cream for the exterior paint.  To my great surprise, pink is not Annabelle's favorite color; she likes teal, blue and green.  I like pink.  So the house will be a combination of those colors inside and out.  I am trying really hard to let Anna make decisions with me, instead of my taking over the whole project.  I do not want her to remember this summer as the summer that"Mommy wouldn't let me make the dollhouse the way I wanted it".  I would love some suggestions on projects that children can do.  She loves to make food and luckily there are a lot of Youtube videos for us to watch together.

This little shell collection is the reason that we decided to make a beach -house.  Isn't it great?  They are real.
We chose the  Laurel by Greencraft because of it's "ease" in assembly and the wrap around porch.  A beach house should have a lot of outdoor living space.  We will have double the foot print for it's base , so.that we can have a garden, lots of flowers and a patio.

I have decided to work with what we have, so that means a lot of prep work.  I have rubbed  a slurry of  wood putty into all of the trim pieces so that they won't splinter when I sand them.  I think the bay window will be the center piece of the tiny kitchen, so I am putting a lot of work into  it.  On the inside I have smeared a watery paste of paper clay and sanded it smooth-ish.

The doors and windows have been wood puttied, sanded and await their place on the house
These flowers are  from my garden and I think the colors will go nicely with the blue and green of the house .  I plan on using these colors for the window boxes plus lavender-pink and candy red.
I have been rambling on...this is what happens if I have too much time to sit alone.

Have a wonderful week,

Wednesday, June 20, 2012

A winner


Annabelle chooses a winner.

It is Susan of  
http://minicrochetmad.blogspot.com  ,  Bella-Mouse will go to Australia!

Bella-Mouse says goodbye to her friends.  They will miss her.


Happy Summer,

Saturday, May 12, 2012

Thank you Degas

 Happy Mother's day From Posy Anna and Evalina Rose
Humble and Pie together at last
This week I made a new Pie.  Pie is Humble bear's side kick.  I had originally made Humble and Pie as a pair, but gave Pie to a friend.  Humble has been lonely, even with the friendship of Posy and Evalina.  Pie still needs clothes, and his ears are too big to be a bear...perhaps Pie will be a mouse.  Any way, he will have to wait to get dressed because I have decided to make a new bear and have her be my first GIVEAWAY on this blog.

     Please help me with advice about Giveaways...I am really new at this, but it looks like such fun.  I am now knitting a little white Mother Bear or Cat--depends on the ears.  She will have a pale pink silk coat and a bag, basket or pocket book, and I think a  white dress knit in a lace pattern.  Please tell me the best way to set up a giveaway!

     I finished my trellised rose.  It is meant to be like a David Austin rose that my mother has.  David Austin roses are old English roses and they bloom in large flushes of flowers that a tremendously fragrant. The multitude of roses became tedious to make, so I will stick to simple tea roses in the future.  My next floral project will be window boxes.  I am going to make every thing removable so that I can decorate for Christmas with seasonal greenery.
The roses are simple,  It is hard for me to get a more realistic rose at half scale.
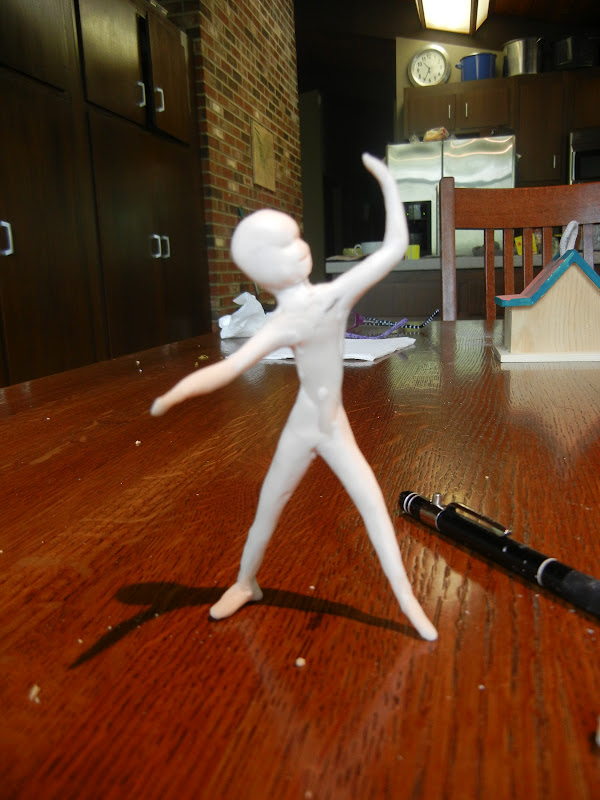
Our resent vacation was to Washington DC, where I dragged my poor daughter through the National Gallery... assuring her all the time that some day she would appreciate it.  She loves to dance, and takes ballet, so the room full of Degas' sculptures was at least interesting to her.  To me, Degas' sculptures brought me to a major realization--real artist use armatures when they are sculpting figures.
She is my first standing project with an armature.  I hope she continues to stand.  I will add muscles and details in steps.  I plan on putting flowers in her hands and a  wreath of flowers in her hair.  I'm already in love with her and she looks like ET.


Happy Mother's Day,
Lucy