Evalina Rose and her little sister Posy Anna are the main characters of a series of children's stories that I am writing. In this blog I will share the final stages of crafting their half scale house--Honeysuckle Cottage--and the miniature stuff that will make up the settings of their stories.

Friday, January 11, 2013

Violet is Finished


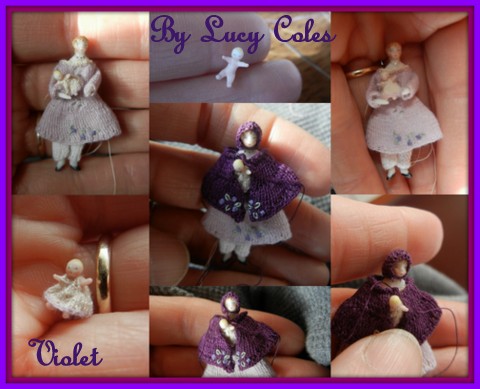
Violet is one of my favorite little dolls.  I sculpted her from porcelain and glazed her so that she looks like a china-head doll.  Her features are china painted and she has dots of gold that are fired on to look like jewelry.  Her clothes are knit on 6/0 needles.  Her dress is made of medira cotton with a lace pattern down the front...Tiny purple flowers are embriorderd at the hem.  I have given her a tiny porcelain doll that I also sculpted, and dressed in a tiny knit dress.  I have a hard time finishing things, and even now am thinking of making her more clothes.
Violet has tiny lavender rose buds embriorderd down the front of her slip. 
Violet and her doll baby.

Violet has a dark purple caplet and bonnet.  I have not yet tied up and snipped all of the threads,as I have not decided how she will be dressed...indoors,or ready for a walk with her caplet. 

It is always nice to finish a project.
Have a wonderful weekend,
Lucy

Wednesday, January 2, 2013

Happy New Year

I just wanted to wish you all a Happy New Year!

Gilliam from   http://makeitsmall.blogspot.com/  , sent Annabelle and me these wonderful little Christmas gifts.  We had so much fun opening them.  Thank you Gill.

Monday, December 24, 2012

Wednesday, December 12, 2012

Tiny Hat Tutorial...A Finishing Touch for Your Little Doll


When I started my blog, I put this tutorial on my Tutorial page.  I have deleted that page, because it was not well thought out.  Now I have taken the pictures and placed them in a collage that you can download and use at your leisure.  If you ever need help with my tutorials, just ask.
The first thing that I do is select a color of fabric...I use silk, but cotton will be fine.   I soak the fabric in a solution of 50/50 tacky glue and water.  I let the fabric dry on a plate, so that it will be smooth.  The doll that I am using is 1 5/8 inches tall...so her head is tiny.
  Measure the circle for the brim of the hat, and cut a circle to the size you like.
Clip a tiny hole in the center of the hat and carefully cut a tiny circle out of the middle of the brim.
Measure the hole to the doll's head.
find a dowel--I used a paint brush--with the same diameter as doll's head.
 Place the brim onto the dowel.
cut a strip of fabric so that it is the desired height of  the tiny hat.
Wind the strip around the dowel, cut strip to fit and glue ends together.
when strip is dry, remove and apply glue to base of strip.
Put the glued strip back onto the dowel so that the glue adheres to the brim.
Let dry.
Cut a tiny circle so that it is the same size as the crown (glued strip).
Glue top to crown
The final hat will need decorations to cover up edges.  I use tiny ribbon to wrap around the crown. Sometimes I glue a piece of silk floss to go around the top of the brim...the little gold hat is a n example.  I use beads, silk ribbon roses and tiny feathers that I collected from a pet love bird..  These little hats really pull together a little doll's wardrobe.

Happy hat making, and have a wonderful week,

Friday, December 7, 2012

Shameless Self Promotion


Actually, self promotion fills me with shame...but it has got to be done.  I started my blog to promote Evalina and other characters for some children's stories that I plan to write.  Evalina will be the main character.  She and  her little sister Posy Anna live in Honeysuckle cottage.  Humble and Pie are their best friends.  For those of you who are unfamiliar with scale miniatures, Honeysuckle cottage is considered a half scale miniature(one half inch equals a foot.  I am making all of the characters and the setting from scratch.
     I am about to send out a Christmas card to some publishers, with hope that they will visit my blog...wish me luck.

I am also getting back, after a long respite, to making and selling my miniatures.  I am preparing to go to the IGMA show in August.  I have opened an Etsy shop, and am slowly putting some of my pieces into it.  At the same time, I have started a Pinterst site.  Please follow, admire and pin me when ever you can...I need the attention.  I am not comfortable with attention, but I need to try harder to get my images out.


I continue to work on Hugo.  He is getting a little teddy bear  who still needs ears and arms

I am putting a Holiday challenge onto my needlework blog
http://mini-needle.blogspot.com/


I have had this clipping for about 20 years....finally, I am knitting him in miniature. I will finish him by Christmas.

My challenge is for the rest of you to make a Christmas item.  I have changed my mind, it does not have to be needle work, any hand made item will be included.  Please send me a picture, and I will  post it.

lucy_coles@netzero.net

Hugs, and Happy Holidays,
Lucy

Monday, November 19, 2012

Meet Violet

I have been finding my work on Pinterest, and I love that. 
 It is my intention to share as much as possible., and I am happy for you to take my images  as long as you attribute them to me (and so far you have). Please do not take pictures of other people's work that appears on any of my blogs.   Also, my tutorial is for a Femo doll, but I generally work in porcelain. 
 Welcome to all my new Pinetrest friends, I have discovered so much while viewing your sites(?).
Violet is my newest doll that I am dressing.  I have just finished a dark purple cape and will add some ruffles to her neckline.  I love her face, it is very sweet.  I do not feel like I make my dolls, I feel like my hands do...I am always glad to meet my little people.

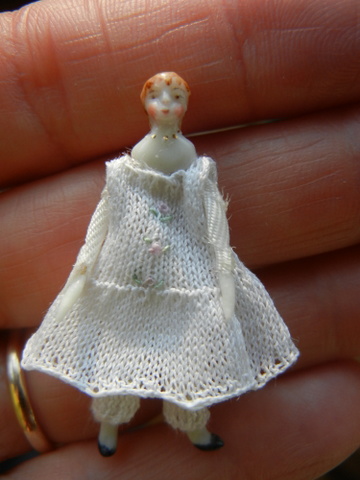
This doll is all knit, knit on 7/0 needles with Nr. 80 Madeira thread. 
Tiny jointed porcelain doll with dress knit on 7/0 needles and Madiera thread

This is my Give-Away on my other blog http://mini-needle.blogspot.com/  Check it out!


I say farewell to dear Eliza as she is off to a new home.


Happy Thanksgiving,
Lucy


Friday, November 9, 2012

Dressing a Tiny Doll


   I thought you might like to dress the little Fimo "china-head doll" that I described a few posts ago.  The following directions will work with any small figure.  This method is simple, and I think , quite nice.  I made collages, as I usually do, to save space.  Follow the pictures from the top, moving left to right.  If you can use the pictures, feel free to down load them for a reference.
First, I wrapped the wires with cloth tape(this is something new for me, I usually use silk ribbon and glue).  I used first aid tape.

 The first step to dressing her is to make some pantaloons.
I fold two squares of material together and cut a tiny curved line...this is the crotch.
  I end up with two identical pattern pieces that are shaped like the third picture.
  Some people just glue the seams, but for some reason, I am very clumsy with glue.  I sew the crotch seam first and then measure the inseam and cut it to fit the inner leg.
  I then sew the inseam  as shown in the fourth picture.
  The fifth picture shows how it will fit before I gather the waist and the ankles.  I like the pantaloons to fit  just bellow the doll's breast plate.
  I use a running stitch to gather the waist and ankles and then carefully glue a tiny piece of lace to the bottom of her pantaloons.

I measure a rectangle of dress material to fit the doll.  (I wanted the dress to come to the top of her shoes.)
 I sew up the side seam and add a tiny bit of glue to the seam to hold it flat.
  I add a piece of lace to the bottom, and gather the waist with a running stitch.
 The sleeves are glued directly onto the arms, using tiny strips of material.
 I apply a bead of glue around her shoulder plate.
 The bodice is a piece of lace, that is glued into a ring.
 I gather the top of the lace with a running stitch(this will be the neck hole) and pull it over her head and press the ruffled  lace into the glue around her shoulder plate.

I chose a purple ribbon for her shoes and the bow for the back of her dress.
 First, I apply glue to her whole foot. Then I wrap the ribbon around the foot pinching the two ends at the back.
  I cut a small piece of fabric tape into the shape of the sole of a shoe.
 I glue the sole onto the bottom of her foot.
 The final touch for this doll is a bow on the back.
 This method could have all sorts of details added to it to make it fancier.  For example tiny pearls can be added to the shoes to look like buttons  and embroidery can be added to the dress. 

This is a little boy who will go with the mother and sister whom I have mentioned in a previous post. I think I am going to name him Hugo because it is such a big name for such a small sweet boy.  I gave him a striped union suit for the fun of it and also because the stripes peek through his sailor shirt.  I  still have to knit his sailor collar and his knickers.  He will have little black boots with "brass" buttons.

I always forget to welcome new followers and to thank my regular followers for their lovely comments.  I do not mean to be rude, I just have a hard enough time getting my pictures and text in the right place...so please forgive me.  Welcome to my new followers and thank you for all the lovely comments, as a mother of two teenagers, I can use any positive feedback that I can get.
Have a great weekend,